
Introduction
This is the first of a group of articles about the technologies that can modernize the applications.
The scope is helping the reader to understand the potentiality of this new way to make business allowing the Companies to be more competitive.
These articles follow my personal approach and studies of Kubernetes.
I’m paying attention to how to make services available and protected by exploiting internal and external native technologies
Let’s start !!!
What is a container
It’s a way to package the applications with their pertinent dependencies and configurations in just one block.
There are at least two big advantages of this approach:
- The container for his native architecture is portable. It means you can run it in any architecture wherever they are located. (please read the article Digital Transformation and Cloud Mobility to get all detail)
- Deploying services prove easier and more efficient than in the traditional world because there are already plenty of software images ready to be used.
Where can I download images to run to the containers?
There are public and private Repositories (please do not mess it with a VBR Repository).
The most famous container technology is Docker that has a public repository called docker hub.
What is a container exactly?
A container allows isolated images to run to an operating system.
Container vs Virtual Machine
The difference between the two architecture seems to be very tiny but actually, they represent two worlds.
The two technologies are virtualization tools but if Docker focuses on the applications layer (picture 1), VM puts its attention to Kernel and application (picture 2)
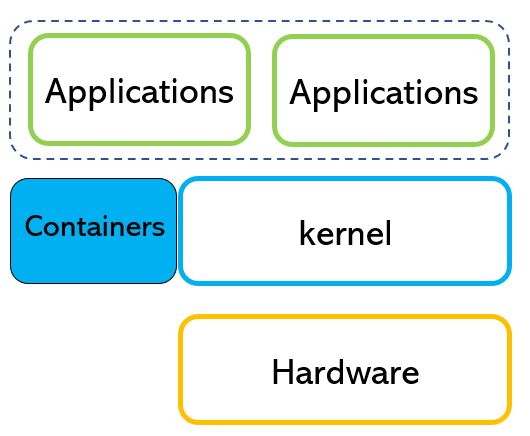 Picture 1
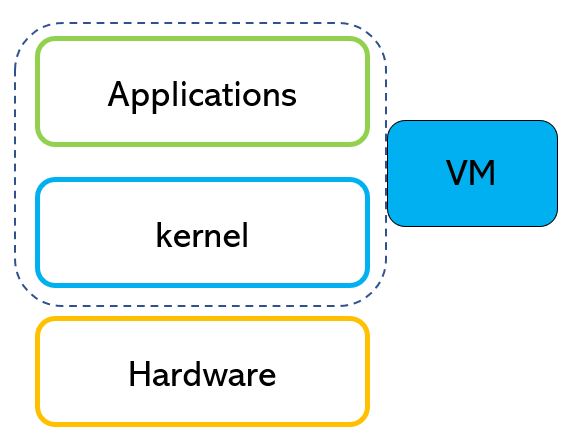 Picture 2
Which are the main advantages of this new approach:
- The container has a small footprint (few MB compare to GB).
- The boot is faster.
- Easier compatibility list.
- It can run in all common operating systems, such as Windows, Mac-OS, Linux.
Container vs Image
It’s crucial to the next articles to have very clear the difference between a container and an image.
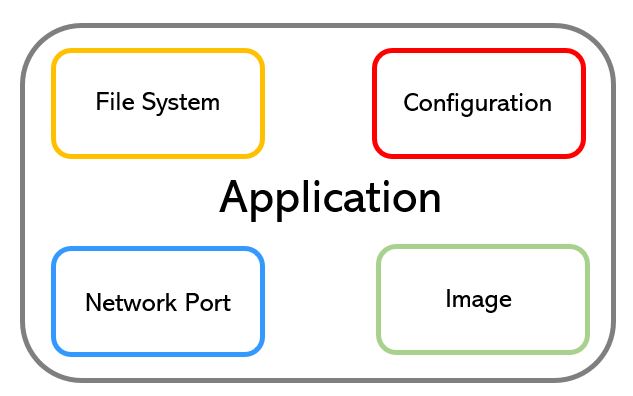
Let’s help ourselves through picture #3 that shows the application composition.
There are four main elements:
- Image: It’s the code written by developers. It is downloaded from Repositories.
- Configuration: It represents the setup created to allow the application to run.
- File System: It’s the place where the application and its data are stored.
- Network: It allows all components to talk to each other.
The container is where the application runs.
 Picture 3
Note 1: Images are part of the container. Think of the container as a multitasking OS specialized to run applications simultaneously.
Note 2: To get info about Docker, please refer to the official website. I.E.: to run an image just launch the following command: docker run image-name
Note 3: There are more Container technologies; the most common are:
- RTK (CoreOS)
- LXC
- LXD (Canonical)
- Linux VServer
- OpenVZ/Virtuozzo 7
- runC
That’s all for now, see you soon and take care.
 Picture 1
 Picture 2
 Picture 3
 Picture 4
 Picture 5
 Picture 6
 Picture 1
 Picture 2
 Picture 3
 Picture 4
 Picture 5
 Picture 6
 Picture 7
 Picture 8
 Picture 9
 Picture 10
 Picture 11
 Picture 12

 Picture 1
 Picture 2
 Picture 3
 Picture 4
 Picture 5
 Picture 6
 picture 7
 Picture 8
 picture 9
 picture 10
 Picture 11
 Picture 13
 Picture 14
 Picture 15
 Picture 16